Photo from Unsplash
OriginallyPosted On: https://massmailer.io/blog/how-to-send-out-a-mass-email-campaign-with-massmailer/
WithMassMailer, you can send Salesforce projects to leads or contacts, send mass sends by mail quickly or schedule for later on, utilize existing design templates or projects to develop brand-new ones and evaluation statistics like bounces, opens, clicks and a lot more. Additionally, MassMailer assists you send mass mail projects without striking any Salesforce email constraints.
Here’s how you can send mass email campaign utilizing MassMailer:
Step 1: Create your Campaign
On the Salesforce campaign tab, click Newto develop a brand-newcampaign It will take you to the Campaign Edit page. Fill in campaign information like Type, Status, Name, Description, and so on
Step 2: Set up Campaign Analytics

In the Campaign page, click SetMember Status This will include the possible MassMailer status worths to the campaign like Open, Delivered, Invalid, Click, Bounce Rate, Unsubscribe, and so on in the campaign data. A dialog box validates the addition of the status worths.
From the AdvanceSet up tab, you can see existing MassMailer statuses. Here you can likewise choose which Statuses will count as Responded.
Step 3: Add/Delete/EditMembers
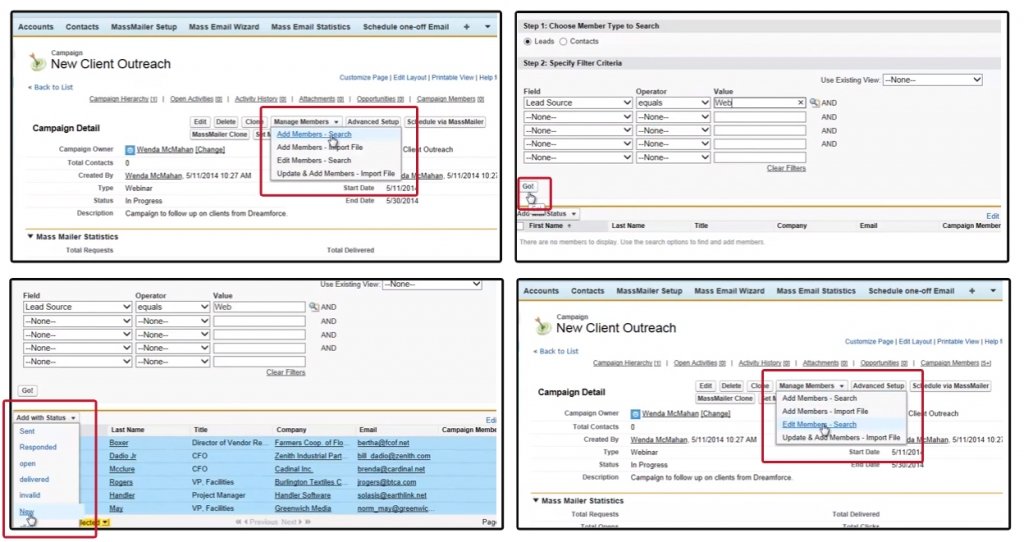
To include brand-new members to your campaign, click the ManageMembers tab. The fall will provide you alternatives on how you desire to include the members. To include members who are currently in your Salesforce database, click AddMembers-Search
You can select member type to search (leads or contacts) and include extra filter requirements if you desire. Clicking on Go will note out members that match the requirements. Use the check box to pick the wanted member.
Once brand-new members are picked, click Addwith Status and choose New from the fall menu to appoint the leads when they are initially included to your campaign.
To view members of the campaign, you can click ManageMembers > > Edit Members– Search You can include, erase, modify and upgrade member statuses from here. Using the filters, you can limit your member search.
Step 4: Send & & Track your Campaign
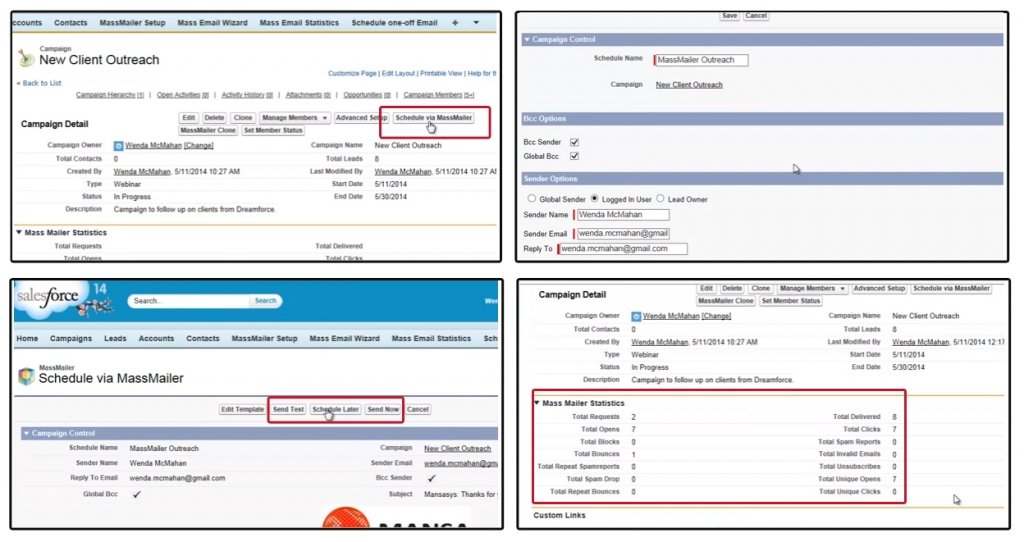
Tosend your campaign, click the Schedule through MassMailer tab.
On this page, you can set your Schedule Name, Bcc Options, Sender Options and choose a Template for thecampaign You can modify an existing design template or send a mass mail with a subject and body copy without utilizing a design template.
Chooseto SendNow or Schedule Later You can even send a test email to your logged in Id from here.
You can discover the analytics of your campaign on the Campaign Detail page with metrics like Opens, Bounces, Delivered, and so on
For more information on how to send a mass email utilizing MassMailer, check out the video listed below:
MassMailer is easy, simple to utilize wizard that extends the abilities and limitations of Salesforce’s mass mailing functions. With MassMailer’s Salesforce friendly user interface, you can send more than 250 e-mails at a time. It allows you to send e-mails to your campaign members, leads and contacts completely from within Salesforce, hence, conserving your effort and time.